
Hi! I'm now working from Wordpress. I've edited this post there, reformatted it so that it is much easier to read & follow my recipe. This link will take your directly to the recipe:
Link to my newest and old recipes, click:
These are very crisp cookies with wonderful floral undertones.

Osmanthus are highly perfumed flowers with a floral scent that is sweet and fruity at the same time. Unfortunately, no one has thought to bottle it into a food grade extract.
The dried flowers are commonly used in China to make a range of sweet dishes. The most enticing sounding one is osmanthus wine. I imagine it might taste sweet and floral. Perhaps like an aperitif or cream sherry?
I have only used the dried flowers to make myself tea but I so enjoyed the scent, I came up with this recipe. The flavours and aroma of the dried osmanthus flowers blooms best in a liquid. As this is a cookie dough, to help it along, a touch of jasmine extract is added to bring out the floral accents.
OSMANTHUS & JASMINE FLAVOURED COOKIES
Prep:
|
10 minutes
|
Cook: | ~15 minutes per baking tray |
Inactive: | 1 hour (for dough to firm up in refrigerator) |
Level: | Easy |
Makes: | 50 cookies |
Oven Temperature: | 320F 160C |
Can recipe be doubled? | Yes |
Make ahead? | Keeps well for at least a week, tightly bottled. Dough can be rolled out, tightly wrapped and then frozen. |
Just the ingredients
8 oz (225 g) unsalted butter
5.64 oz (160 g) confectioner's/icing sugar
1 egg yolk
4 + 2 Tablespoons dried osmanthus flowers
Jasmine flavour/extract
12.35 oz (350 g) all-purpose/plain flour
2 Tablespoons rice flour
1/4 teaspoon salt
|

8 oz (225 g) unsalted butter
I use butter with a butterfat content of at least 82 to 83%. European butters typically have butterfat that falls within these percentages. I am partial to the French brand, President for baking these cookies. Whichever brand of butter you choose to use, it must have at least a minimum of 82% butterfat.The higher butterfat and lower water content content means a more buttery and crisp cookie.
5.64 oz (160 g) confectioner's/icing sugar
1 egg yolk
4 + 2 Tablespoons dried osmanthus flowers
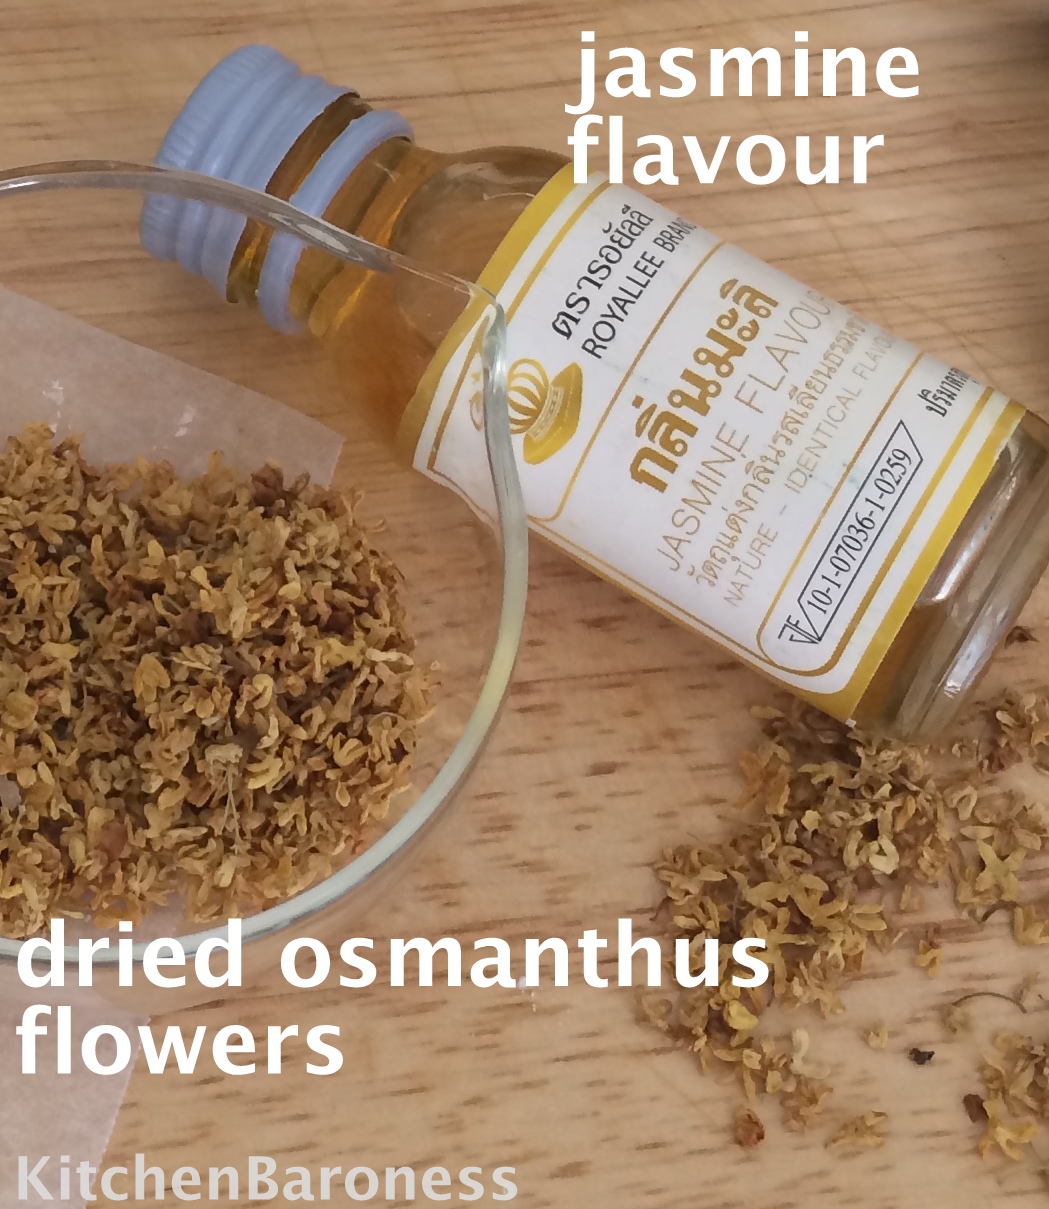
May be purchased from Traditional Chinese Medicine stores, some tea shops and health stores. It is available from online stores. I have never seen food grade osmanthus essence/extract/flavour sold anywhere. Scroll down to 'Tips' for other ways to use osmanthus flowers and a bit of information on this very floral smelling flower.
Jasmine flavour/extract
The amount of extract you use depends on its quality. I bought my bottle in Thailand. It is very mild. I had to use 1 and 1/2 teaspoons. You want a slight hint of jasmine as the floral scent of the osmanthus needs to come through as well. My bottle is hard to purchase outside Thailand but I noticed that you can buy rather good quality food grade jasmine extract on Amazon.
12.35 oz (350 g) all-purpose/plain flour
2 Tablespoons rice flour
This is that extra something that will make the cookies that bit more crisp.
1/4 teaspoon salt
Omit if you are using salted butter
Method
Remove the unsalted butter from the refrigerator and leave it out to soften. Soften means when you push on the butter with your finger, there is a firm give. The feel would be somewhat similar to when you use your finger to push into a firm pillow/cushion. You do not want the butter to be too soft or 'melty'.
If the butter has become too soft, firm it back up in the refrigerator. You do not want to use butter that has become too soft as it will not cream up thick and voluminous. Instead, it will be very liquid.
In a food processor, grind 4 Tablespoons of the osmanthus flowers with 3.52oz (100g) of the all-purpose/plain flour. You should have a fine powder. I use my coffee grinder.
Mix in the remaining all-purpose/plain flour, rice flour and salt. I use my food processor to do this and save myself the step of sifting.
Cream the softened butter with the sugar. Start at low to avoid the sugar from flying out of the mixer bowl and increase to medium-high speed for 2-3 minutes.
 Stop the mixture and scrape the bottom of the mixer bowl. Turn on the machine and let it run for 2-3 more minutes until it is pale and creamy.
 Reduce to medium-low speed and add the egg yolk and the jasmine essence. Let the machine run for 1 minute.
Turn off the machine. Scrape the bottom of the mixer bowl. Turn the machine back on and let it run for another minute. It will look even thicker and creamier.
 Remove the mixer bowl.
With a spatula, fold in 1/3 of the flour mix. The flour does not have to be fully incorporated at this point.
 Add the next 1/3 of the flour mix and repeat the procedure.
 Finally, add the last 1/3 of the flour mix. Repeat procedure and do not over mix.
 The following process is the easiest way to get the dough prepared for cutting.
Plop the dough into a large food safe plastic bag. The bag should be big enough to accommodate the rolled out the dough. If it is not, split the dough into 2 bags instead.
 Placing a silicone baking mat under the plastic bag helps to secure it in place to make rolling a breeze. Fold the open end of the plastic bag under to form a rectangle.
 Roll the dough out no thinner than 1/8" (0.317cm).
 No mess. No flour. Easier clean up. Refrigerate until completely cold and firm.
Preheat the oven to 320F(160C) oven rack adjust to lower middle position.
Have the following ready:
With the knife, slice off the top sheet of the plastic bag to reveal the dough.
Dip the cookie cutter into flour, shake off excess and make a clean straight cut. You could slip your fingers under the plastic sheet to help pop up the cut cookie dough.
 With my 'food safe plastic bag' method, there is no need to flour your working surface or the rolling pin. No need to worry about cookie dough sticking to the working surface, over handling or adding too much flour- both of which could ruin the texture of your cookies.
These cookies do not spread so you do not have to space them too far apart on your baking tray.
Do not leave cut cookies on the kitchen counter. Either bake immediately or refrigerate as it has to be cold when it goes into the oven. This helps bake crisp cookies. The cookie will keep its shape better, retaining all the pretty ridges around its circumference.
Remember the remaining 2 Tablespoons of osmanthus? Press them on to your cut cookie dough.
 Bake for 8 minutes. Rotate the baking tray front side back and bake for another 7 minutes or until the edges are very lightly browned. You want to keep the pale colour of the cookies.
 That is why the oven rack was positioned lower middle rack and the temperature was kept low.
Remove from the oven, leave to cool for 5-10 minutes on the tray as they are still fragile whilst hot. Thereafter, cool completely on a cooling rack. Store in airtight containers.
Tips
What do you do with the rest of the dried osmanthus flowers?
I like a marbled cake that is not only moist. The buttered bits has to be buttery and the chocolatey bits has to taste intensely chocolatey. Just like the one below!

Method
Remove the unsalted butter from the refrigerator and leave it out to soften. Soften means when you push on the butter with your finger, there is a firm give. The feel would be somewhat similar to when you use your finger to push into a firm pillow/cushion. You do not want the butter to be too soft or 'melty'.
If the butter has become too soft, firm it back up in the refrigerator. You do not want to use butter that has become too soft as it will not cream up thick and voluminous. Instead, it will be very liquid.
In a food processor, grind 4 Tablespoons of the osmanthus flowers with 3.52oz (100g) of the all-purpose/plain flour. You should have a fine powder. I use my coffee grinder.
Mix in the remaining all-purpose/plain flour, rice flour and salt. I use my food processor to do this and save myself the step of sifting.
Cream the softened butter with the sugar. Start at low to avoid the sugar from flying out of the mixer bowl and increase to medium-high speed for 2-3 minutes.


Turn off the machine. Scrape the bottom of the mixer bowl. Turn the machine back on and let it run for another minute. It will look even thicker and creamier.

With a spatula, fold in 1/3 of the flour mix. The flour does not have to be fully incorporated at this point.


Plop the dough into a large food safe plastic bag. The bag should be big enough to accommodate the rolled out the dough. If it is not, split the dough into 2 bags instead.


Preheat the oven to 320F(160C) oven rack adjust to lower middle position.
Have the following ready:
- sharp/serrated knife
- cookie cutter
- small bowl of flour (for dipping cookie cutter)
- rolling pin
- silicone baking mat or parchment paper lined baking tray(s)
With the knife, slice off the top sheet of the plastic bag to reveal the dough.
Dip the cookie cutter into flour, shake off excess and make a clean straight cut. You could slip your fingers under the plastic sheet to help pop up the cut cookie dough.

These cookies do not spread so you do not have to space them too far apart on your baking tray.
Do not leave cut cookies on the kitchen counter. Either bake immediately or refrigerate as it has to be cold when it goes into the oven. This helps bake crisp cookies. The cookie will keep its shape better, retaining all the pretty ridges around its circumference.
Remember the remaining 2 Tablespoons of osmanthus? Press them on to your cut cookie dough.


Remove from the oven, leave to cool for 5-10 minutes on the tray as they are still fragile whilst hot. Thereafter, cool completely on a cooling rack. Store in airtight containers.
Tips
What do you do with the rest of the dried osmanthus flowers?
- Store sealed in the refrigerator. It keeps well.
- Make yourself some osmanthus tea. One teaspoon per cup.
- Mix the osmanthus flowers with a tea of your choice to add a floral brew to your cup.
- If you google 'osmanthus jelly recipe', there are recipes (all similar) for that jelly. It is an easy jelly recipe and it taste even more perfumed than my cookies. Some might find it overpowering whilst others just cannot get enough of it.
What are osmanthus flowers?
It comes from a flowering plant/shrub bearing tiny cream coloured flowers.
It is more often than not used in its dried form as fresh osmanthus flowers are highly perishable. When dried, they are a lovely golden yellow. Most of the dried osmanthus sold in shops are from China. It is appreciated for its distinctive floral aroma. It is most often used in sweet dishes but it can apparently be used in savoury dishes as well. Osmanthus wine is enjoyed in China. It must taste lovely.
 |
| What do you know? There is an osmanthus shrub in my neighbourhood! |
I buy my osmanthus from a Traditional Chinese Medicine store that carefully sources what they put on their shelves. They cost more but I pay the price for the assurance of quality.
WHAT'S COMING UP NEXT? I like a marbled cake that is not only moist. The buttered bits has to be buttery and the chocolatey bits has to taste intensely chocolatey. Just like the one below!


