Hi! I'm now working from Wordpress. I've edited this post there, reformatted it so that it is much easier to read & follow my recipe. This link will take your directly to the recipe:
Link to my newest and old recipes, click:
These aren't just sugar dipped cookies. These crumbly melt in your mouth cookies are dipped in Homemade Vanilla Icing Sugar and the dough is made with nothing less than the same 'vanillalicious' sugar.
I always have Homemade Vanilla Sugar in my pantry. When it comes to vanilla extract, I buy the best quality available to me. In my pantry, there also sits, a bottle of my homemade vanilla extract.
Although undeniably flavourful, vanilla extract cannot be compared to the purest vanilla taste that can only come from the gooey pulp and seeds of plump vanilla pods.
 |
| Homemade Vanilla Icing Sugar |
The easiest and best way to taste the difference between vanilla extract and pure unadulterated vanilla is to firstly, make some Homemade Vanilla Sugar. Then, we make 2 glasses of the iced cold, refreshing Indian yogurt drink called, Sweet Lassi (click for the recipe) using vanilla extract in one and Homemade Vanilla Sugar in the other.
A Sweet Lassi made with Homemade Vanilla Sugar is lightly perfumed and has a clean yet definitive taste of vanilla. Very delicious and very drinkable. You would want to reach out for another glass.
A Sweet Lassi made with vanilla extract has a stronger aroma. A fragrance that one quickly associates with something from a bottle. It is an appetising scent nonetheless. This Sweet Lassi taste delicious but after a glass of it, you will realise that you can't drink too much of it without feeling a bit ill because of all the add-ons that goes into the making of bottled vanilla extract.
Now both versions taste very good but I am quite certain that given a choice, you would rather have a second glass of Sweet Lassi made with Homemade Vanilla Sugar and hesitate on a second glass made with vanilla extract.
I had my first Vanillekipferl in Vienna and had quite forgotten about them until a month ago. I was at a pasticceria and spotted just 6 pieces of them on a little white plate behind the showcase. They looked lost and forlorn amongst the many pretty multi-coloured cake slices, pastries, pies, macaroons, mousse...
Why were there so few Vanillekipferls? Where they leftover from yesterday? Didn't anyone else realise that these cookies are delicious? I had never seen them for sale at local bakeries. Then again, I was not really looking for them.
I had to have one with my coffee.
The Vanillekipferl was very good. It had an initial crunch upon biting and then the cookie just crumbles in your mouth whilst the cool icing sugar melts away around the tip of your tongue. It was a very satisfying cookie to have.
I liked it so much, I had to bake some at home so that I could stuff myself with more!
There are numerous recipes online for Vanillekipferl. My european cookery books also offered varying recipes. It became quickly apparent that these cookies are a firm favourite in many european countries. They might go by different names but they were essentially the same sugar dusted crescent shaped cookies with a dough base that had either some ground almonds or walnuts thrown in.
As Vanillekipferl is a vanilla cookie, I decided from the start that in order to bake the best testing Vanillekipferl, my cookies would need to have the purest taste of vanilla. No vanilla extract. No 'artificial vanilla sugar'. I would use my Homemade Vanilla Sugar, made from just a vanilla pod and icing sugar.
After 3 bakes of Vanillekipferl using my Homemade Vanilla Sugar, I had my yummy, crumbly 'melt-in-the-mouth' cookie recipe down pat.
Then I thought, I should try baking some using store bought 'vanilla sugar'. After all, that is what is more often than not called for in traditional Vanillekipferl recipes. This 'vanilla sugar' is often sold in sachets (~0.28oz)(~8g) and is sugar with the addition of artificial vanilla flavouring. One sachet is probably equivalent to 1 - 2 teaspoons of vanilla essence.
So how did my Vanillekipferl baked with a sachet of 'vanilla sugar' turn out?
It tasted very much like the Vanillekipferl I had in Vienna. Pretty authentic and delicious. Although, I much preferred those made with my Homemade Vanilla Sugar as it has so much more of that fresh vanilla taste.
Finally, I had to try baking a batch of Vanillekipferl using vanilla extract as that is what most home bakers would have in their pantry. I would have to dust the cookies with ordinary icing sugar as I had to assume that if the home baker was not inclined to go through the effort to make his own Homemade Vanilla Sugar or to buy a sachet of 'vanilla sugar' then he would simply use regular icing sugar throughout the recipe.
Did these vanilla extract cookies taste good?
It is a good cookie but nothing I would crave to eat again. It taste like an ordinary cookie flavoured with vanilla extract. It did not help that I could only use icing sugar to dip the cookies in. Perhaps, if I had dusted them with either Homemade Vanilla Sugar or even icing sugar mixed with a sachet of 'vanilla sugar' it might have made them more interesting to eat.
I have included instructions on how to bake Vanillekipferl using either Homemade Vanilla Sugar, store bought sachets of 'vanilla sugar' or vanilla extract. To suit your tastebuds and lifestyle, you decide which of the three you would rather use.
VANILLEKIPFERL, EUROPEAN COOKIES MADE WITH HOMEMADE VANILLA ICING SUGAR
|
|
|
|
|
|
|
|
|
|
|
|
|
|
~ 50 crescent shaped cookies
|
|
|
|
|
|
|
|
|
Cookie dough can be made up to 2 days ahead. Baked cookies keep very well, tightly covered, up to 2 weeks and perhaps longer!
|
Choose your sugar for the cookie dough
3oz (85g) icing (confectioner's) sugar
OR
~ 4 cups (2 lbs)(1kg) icing (confectioner's) sugar + 1 vanilla pod to make Homemade Vanilla Sugar. Use 3oz(dough) + 3oz(dusting) and store the excess.
This is my preferred sugar to use for this recipe.
OR
3oz (85g) icing (confectioner's) sugar mixed into 1/2 a sachet of 'vanilla sugar' to make 'artificially flavoured vanilla sugar'
For rest of the cookie dough
scant 1/2 teaspoon cornflour (only if making your own icing sugar)
6oz (170g) unsalted butter
1/4 teaspoon salt (only if using unsalted butter)
3oz (85g) ground almonds
10oz (283g) all-purpose/plain flour
1 egg yolk
1/2 teaspoon vanilla extract (only if using regular icing sugar)
1 - 2 Tablespoons milk
For coating the baked cookies
3oz(85g) icing sugar
OR
3oz(85g) Homemade Vanilla Sugar
OR
3oz(85g) icing (confectioner's) sugar mixed into 1/2 a sachet of 'vanilla sugar' to make 'artificially flavoured vanilla sugar'
|
Choose your sugar for the cookie dough
3oz (85g) icing (confectioner's) sugar
You need to use icing sugar to achieve that 'melt in the mouth' texture. If you do not want to buy icing sugar, you can make your own. Recipe is outlined in 'Method'.
OR
~ 4 cups (2 lbs)(1kg) icing (confectioner's) sugar + 1 vanilla pod to make Homemade Vanilla Sugar.
This is my preferred sugar to use for this recipe. You would only need 3 oz (85g) for the cookie dough and 3 oz (85g) for coating the baked cookies . Keep the extra Homemade Vanilla Sugar in your pantry. It keeps indefinitely and has heaps of uses. Recipe is outlined in 'Method'.
OR
3oz (85g) icing (confectioner's) sugar mixed into 1/2 a sachet of 'vanilla sugar' to make 'artificially flavoured vanilla sugar'
Sachets of 'vanilla sugar' can be purchased at bake shops and some supermarkets. They come in ~ 0.28oz(8g) sachets. It is made of sugar and artificial vanilla flavouring. Recipe is outlined in 'Method'. An image of the sachet can be seen in the photograph (above) containing recipe ingredients.
For the rest of the cookie dough
scant 1/2 teaspoon cornflour
Scant 1/2 teaspoon to every 3 oz (85g) of granulated/coarse/castor/fine sugar. Use only if you are making your own icing sugar. Why? Cornflour prevents caking. Store bought icing sugar does contain cornflour. In small amounts, cornflour helps to crisp up cookies, making them a little lighter and crumbly.
6oz (170g) unsalted butter
Cut the butter into smaller blocks. Leave the butter on your kitchen counter to soften. What does 'soften' mean? When you press onto the butter with your finger, it should leave a depression but the butter should still be softly firm. The butter should not be at all 'melty'.
1/4 teaspoon salt
Only if using unsalted butter.
3oz (85g) ground almonds
10oz (283g) all-purpose/plain flour
1 egg yolk
1/2 teaspoon vanilla extract
Only if you are using regular icing sugar.
2 Tablespoons milk
Enough to bring dough together.
For coating the baked cookies
3oz(85g) icing sugar
OR
3oz(85g) Homemade Vanilla Sugar
OR
3oz(85g) icing (confectioner's) sugar mixed into 1/2 a sachet of 'vanilla sugar' to make 'artificially flavoured vanilla sugar'
Method
THE SUGARS
If you are making icing sugar
Grind 3 oz (85g) sugar (coarse, granulated, fine, etcetera) with a scant 1/2 teaspoon cornflour.
Double the proportions if you need to make icing sugar to coat the baked cookies as well.
If you are making Homemade Vanilla Sugar
Split the vanilla pod down its length. With a butter knife or a teaspoon, scrape off the squidgy pulp/seeds into ~ 4 cups (2 lbs)(1 kg) of icing sugar. Grind it up in a food processor until it is well mixed and looks like dust. Excess Homemade Vanilla Sugar can be stored indefinitely and used in recipes for confectioneries or to make delicious vanilla flavoured iced Sweet Lassi.
Do not use a sharp knife to scrape off the vanilla as you might inadvertently scrape off the tough fibres from the pods which is inedible.
The scraped out pod still has loads of flavour and can be stored with the remaining Homemade Vanilla Icing Sugar to further infuse the sugar.
Please note that if you are grinding up Homemade Vanilla Icing Sugar from anything other than icing sugar (for eg. coarse, granulated, fine sugar etcetera) for use in this recipe, do remember to measure out the quantity of Homemade Vanilla Sugar required for this recipe and then mix in the appropriate ratio of cornflour to that measured quantity of Homemade Vanilla Sugar. That tiny amount of cornflour will help make the cookies that bit more crumbly and crisp. The ratio is: 3oz(85g) of sugar to a scant 1/2 teaspoon cornflour.
If you are making homemade 'artificially flavoured icing sugar' using a sachet of 'vanilla sugar'
Mix the full 1 sachet of 'vanilla sugar' into 6 oz (170g) of icing sugar. After mixing, remember to divide the 6 oz (170g) of homemade 'artificially flavoured icing sugar' into 2 portions: 1 quantity to be used for the cookie dough, 1 quantity to be used for coating the baked cookies.
THE COOKIE DOUGH
With the mixer on medium, cream the softened butter with the vanilla sugar until it is light coloured and creamy. If you are using a KitchenAid, use the whisk attachment.
Turn off the mixer, mix the batter quickly with a spatula to fully incorporate.
Add the egg yolk (and vanilla extract only if you are using regular icing sugar). Turn the machine on to medium-low and mix for 1 minute.
Turn off the mixer and mix the batter quickly with a spatula to fully incorporate.
If you are using a KitchenAid, switch to the paddle attachment. Add the ground almonds, flour and salt, if using. Turn on the mixer to medium-low and let the machine run until almost all of the ground almonds and flour have been incorporated.
Turn off the mixer and use a spatula to complete the mixing. Remember to scrape the bottom of the bowl as there would most likely be some flour there.
You would probably need to add at least 2 Tablespoons of milk to bring the dough together. The dough has to adhere easily together.
With the machine running on low, add that 1 Tablespoon of milk to incorporate. Add another tablespoon of milk if necessary. Turn off the machine. The dough should not be crumbly and it should feel as if you would be able to roll the dough out easily into crescents.
Tear off an arm length's worth of plastic wrap and lay it flat on your work top. Empty cookie dough onto it. Roll into a log. Wrap with the plastic wrap, leaving a 1"- 2" (2.5cm - 5 cm) air pocket of plastic on all 4 sides.
Use a rolling pin or your hands to roll/push the dough out to fill the entire plastic wrap so that it looks vacuum sealed. Leave in the refrigerate to firm up slightly, ~ 30 minutes.

Pre-heat the oven to 340F(170C), oven rack adjusted to centre position.
Remove dough from the refrigerator and onto your work surface. Cut the dough into 2, length-wise. Then, cut into smaller rectangles so that you can roll each cut piece into a short cigar. Fold cigars into 2 to form a crescent.
Should you find it difficult to roll or shape the dough because it is too dry or crumbly, moisten the dough with a little milk.
Lay the crescent with the sharp ends pointing inwards so that they are less likely to burn in the oven.
BAKING
Bake a total of 15 minutes. Half way through baking, turn the cookie sheet back side front to encourage even baking.
Whilst waiting for cookies to bake, set up a process line to dip the cookies in icing sugar. Hot cookies hold in more icing sugar than cooled ones.
When the cookies have slightly browned around the ends, they are cooked.
Remove from the oven, cool just 1 - 2 minutes and with a cookie spatula, lift out one cookie at a time to the awaiting bowl of icing sugar. Dip cookies top and bottom and set down on a cookie rack to cool completely.
To store, dip cookies again in any icing sugar leftover in the dipping bowl before piling them into air-tight cookie jars.
Tips
Baking with icing sugar means that your kitchen will very likely be powdered with a thin layer of icing sugar.
To minimise the clean up, here's what you can do:
- Keep windows closed and keep the fans turned off. Icing sugar is so light weight, you will be surprised at how far they can be carried off by drafts.
- Stick to one work surface and line with clean, wet kitchen towels that have been wrung of excess water. This will minimise icing sugar from being carried off from your work surface onto the floor.
- If you are grinding up sugar to turn into icing sugar or making Homemade Vanilla Sugar, once the food processor has turned the sugar into a fine powder, do not open up the processor. Leave it to settle, ~ 5 minutes, before opening or you will be sprayed with a huge puff of white sugar powder.
- Before turning on the mixer to cream the butter and icing sugar, use a spatula to work in the icing sugar so that you minimise 'fly away' icing sugar when the mixer is turned on.
- Clean up any spillage of icing sugar quickly.
WHAT'S COMING UP NEXT?
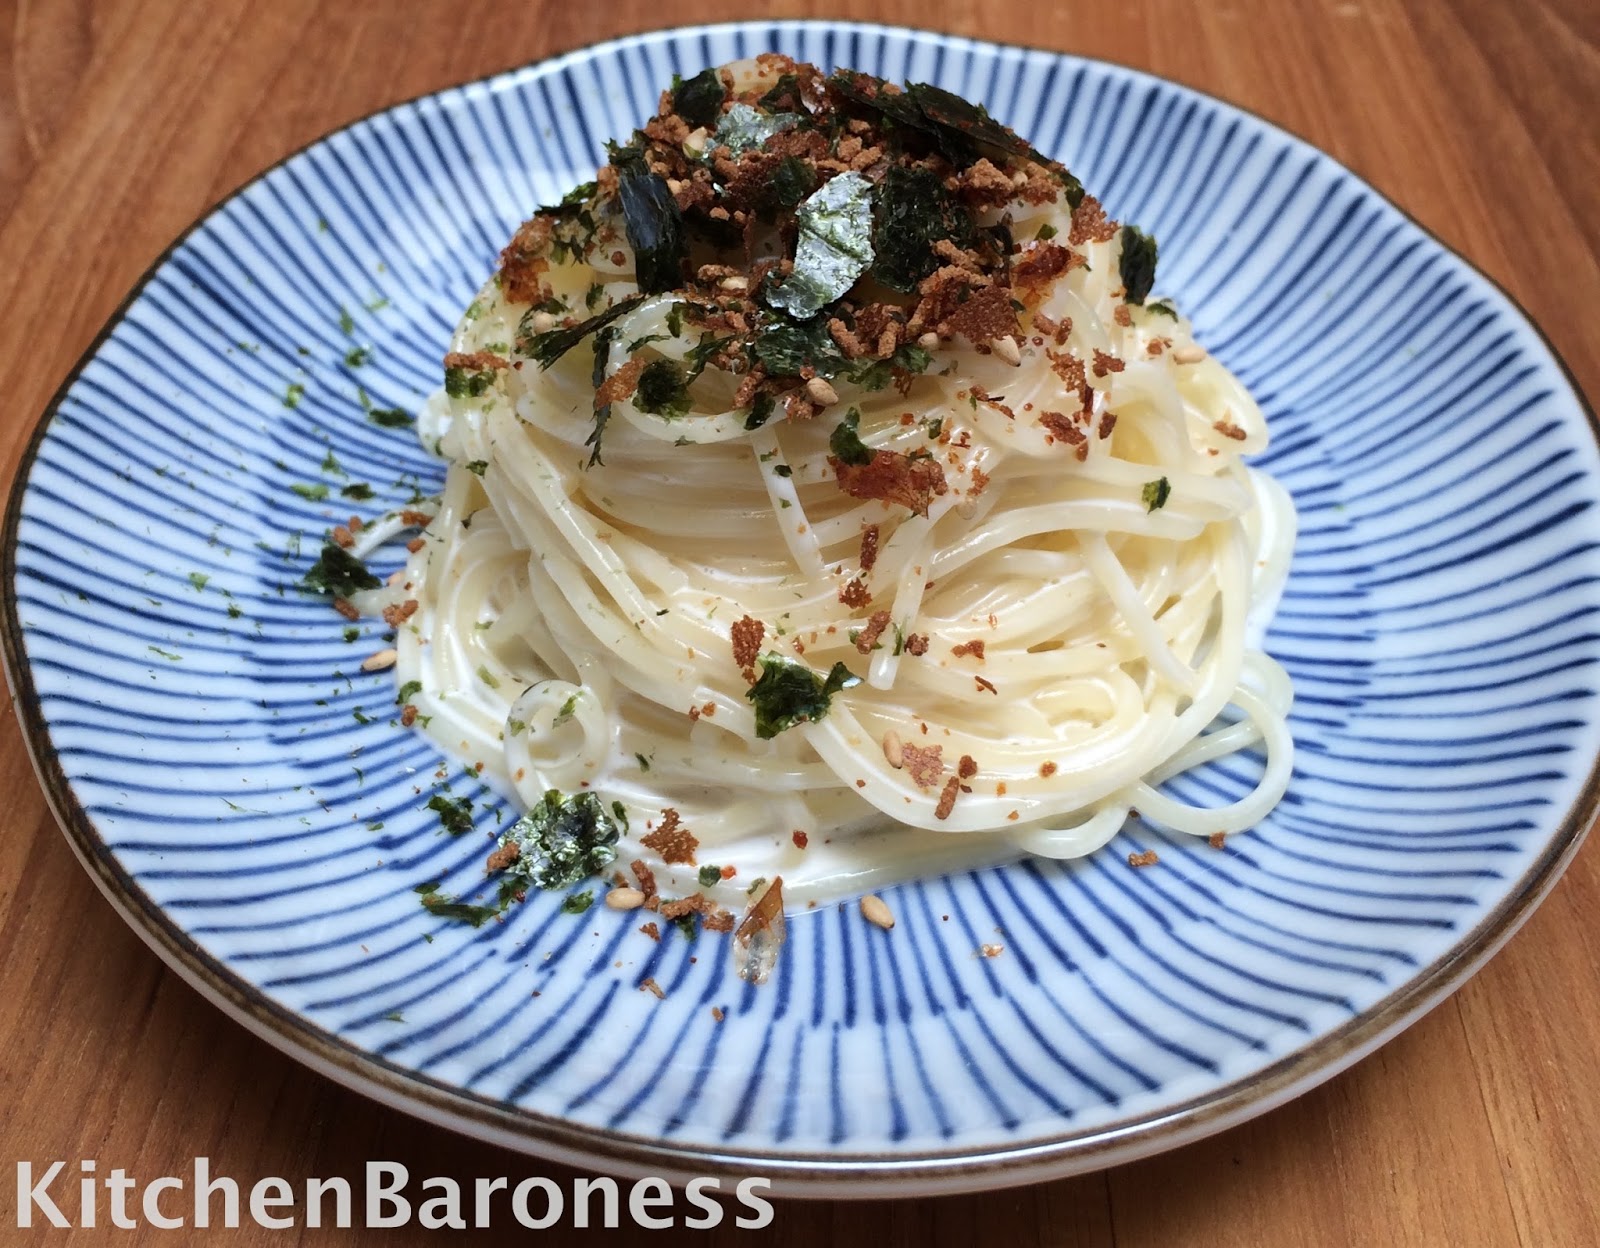
Something almost identical to this is served at a Japanese restaurant that I frequent. It is not on the menu (actually, I don't think I have ever seen their menu) but if you tell them 'an order of the special noodle' this would be served to you.
I call this my Japanese Inspired Cold Truffle Noodles With Sweet Dried Shrimps, Tobiko (flying fish roe), Cucumbers & Chives. The smell of the truffle oil mixed with the sweet dried shrimps is bound to entice people into your kitchen!