Tuesday, 3 November 2015

Marbled Bundt Cake That's Distinctly Buttery And Chocolatey


Hi! I'm now working from Wordpress. I've spent a great deal of time editing and reorganising this post on Wordpress and it is so much friendlier to read & follow my recipe from there. Click on this link to take you directly to the recipe:
Link to my newest and old recipes, click:
Buttery and chocolatey. But how do you release this moist cake baked in a bundt pan cleanly without any of it getting stuck in the intricate corners?
 Getting the marbled cake to taste good was the easy part. Getting the cake to release cleanly leaving me with a lovely cake with smooth sides was challenging. The solution is so easy, it's laughable.
My first four cakes stuck stubbornly to the bundt pan. To prepare the bundt pan for baking, I had generously buttered the pan. Strike one. I then buttered and floured. Strike two. I moved on to generously oiling the pan. Strike three. Then, I oiled and floured. Another disaster. I was out of the game. Those intricate corners of a bundt pan makes for a pretty looking cake but they made my life quite miserable.

I went to the store and bought myself a cake release spray. I was holding off buying one as I was thinking how different could it be from buttering and flouring the bundt pan yourself? I did not want to send you into the store to buy something that was unnecessary. Let me tell you, it was success at cake number 5! It is worth going into the store. I would not bake another bundt cake without my cake release spray!

The can of cake release spray contains a mix of oils, flour and soy lecithin. The latter helps the cake batter stick onto the oils/flours of the cake release spray rather than the bundt pan. That's why it works like a dream. 

Just to be sure that I was sending you into the store for a worthy purpose, I baked cake number 6 using the most intricate bundt pan I have which had previously made cake numbers 1 and 2 stick furiously to the pan. This is how cake number 6 looks. Beautiful isn't it?
MARBLED BUNDT CAKE THAT'S DISTINCTLY BUTTERY AND CHOCOLATEY
Prep:
20 minutes

Cook:

40- 50 minutes 

Inactive:

-

Level:

Moderately easy. You must get a cake release spray when baking in a bundt pan.

Makes:

1 large cake (baked in 1.5 litre bundt pan)

Oven Temperature:

300F 150F

Can recipe be doubled?

No

Make ahead?

Keeps well for at least 2 days on the kitchen counter, tightly wrapped or in an airtight cake container to keep in all the moisture.
Just the ingredients
9.7oz (275g) unsalted butter
2.64oz (75g) cream cheese
10.58oz (300g) caster sugar
1 cup of eggs (4 - 5 eggs)
2 teaspoons vanilla essence/extract
8.81oz (250g) self-raising flour
OR
To make self-raising flour
Place your bowl on the kitchen scales. Add 3 teaspoons baking powder, 1/2 teaspoon salt and top up with enough all-purpose/plain flour to reach 8.81oz (250g)
2.64oz (75g) ground blanched almonds
1/2 teaspoon salt
Add only if you are using unsalted butter and store bought self-raising flour.
1.58oz (45g) good quality chocolate
2 Tablespoons cocoa powder
1 teaspoon instant coffee powder
3 Tablespoons milk
Ingredients

9.7oz (275g) unsalted butter
2.64oz (75g) cream cheese
10.58oz (300g) caster sugar
1 cup of eggs (4 - 5 eggs)
2 teaspoons vanilla essence/extract
8.81oz (250g) self-raising flour
OR
To make self-raising flour
Place your bowl on the kitchen scales. Add 3 teaspoons baking powder, 1/2 teaspoon salt and top up with enough all-purpose/plain flour to reach 8.81oz (250g)
2.64oz (75g) ground blanched almonds
1/2 teaspoon salt
Add only if you are using unsalted butter and store bought self-raising flour.
1.58oz (45g) good quality chocolate
I use Valrhona -Guanaja 70% cocoa minimum - pure cocoa butter or Scharffenberger 70% bittersweet chocolate bar.
2 Tablespoons cocoa powder
I use either Valrhona or Green & Black's organic range.
1 teaspoon instant coffee powder
3 Tablespoons milk

Method

Preheat oven to 300F 150C. Oven rack adjusted to lower middle position.

Preparing your ingredients

Butter & cream cheese

Remove the unsalted butter and cream cheese from the refrigerator and leave it out to soften. Soften means when you push on the butter or cream cheese with your finger, there is a firm give. The feel would be somewhat similar to when you use your finger to push into a firm pillow/cushion. 

You do not want to use the butter if it is too soft or 'melty'. If you do, you risk the batter turning runny on you and it will not cream up voluminous. If I were you, I would return it to the refrigerator and let it firm up a little.

Eggs

Eggs should be at room temperature so that the batter will not split which often happens if your butter or eggs are too cold.

If the eggs are from the refrigerator, you could pour hot (not boiling) water into a bowl and let the cold eggs sit in the bowl for 10 minutes. Dry eggs completely before using.

Dry ingredients

Sift the flour, salt and ground almonds through a large-holed sift (or use a fine mesh strainer). There are usually some large chunks of almonds that needs to be broken up so I use a sift/strainer.

Melting chocolate
  • It is very convenient to melt it in a microwave on medium-high power for about 40 seconds. Do not melt it completely as you risk it burning. I melt it 1/2 to 3/4 of the way and let the residual heat melt the chocolate completely.
  • If you are doing it over the stove top, it is best to bring a little water to simmer. Place the chocolate in a heat proof container and sit it in the simmering water for 1 minute and turn off the heat. The chocolate should melt in the residual heat.
  • If your oven is being preheated for baking, place the chocolate in a heat proof container and then into the oven. How long it takes to melt, depends on the heat of your oven. Watch it carefully and again remove when it is 1/2 to 3/4 melted.
Cocoa powder, instant coffee powder and milk

Heat the 3 Tablespoons of milk until it is just boiling. Remove from heat source, stir in cocoa and instant coffee powder until dissolved. Do not miss this step of adding boiling liquid to hot cocoa powder. The liquid heat helps to maximum the flavour of the cocoa powder.

Start putting the batter together

Attach the wire whisk to the standing mixer. Cream the butter and cream cheese until it light coloured and fluffy. Start on low speed and work up to medium-high speed. It usually takes about 5 minutes of creaming. In between, stop the machine and scape bottom and sides of the bowl and then continue creaming.
Bring down the speed to medium and with the machine still running, gradually add in the caster sugar. Increase speed to medium-high and cream until the batter is even more voluminous and thick. About 5 minutes. In between, stop the machine and scape bottom and sides of the bowl. 
Reduce speed to medium-low and add 1/4 cup of eggs. Let the machine run for a minute bringing up the speed to medium if necessary to help the eggs incorporate into the batter. Turn off the machine, scrape bottom and sides of the bowl.
Add the next 1/4 cup of eggs, and following the same procedure. 

Continue the same process with the third portion of 1/4 cup eggs.

Do the same for the last portion of 1/4 cup eggs + add in the 2 teaspoons vanilla essence at the same time as the eggs. Do not be alarmed if the batter becomes more liquid.

When you have finished scraping the bottom and sides of the bowl, you need to mix it one last time on medium speed for 1 minute. 

Add 1/3 of the pre-sifted flour/almonds mix into the batter. With a spatula or wide faced long handled spoon fold gently into the batter. The batter will start to thicken up. As you fold, remember to scrape up the batter from the bottom of the bowl.

Continue the same process with the second 1/3 portion of flour/almonds mix.

Do the same for the last 1/3 portion of flour/almonds mix.

In a separate medium size bowl, add the melted chocolate and then the cocoa, instant coffee and milk mix. Stir to incorporate. It might harden a little which is fine.

Add a small dollop of batter into the chocolate mix to help loosen up the mix.

Add about another 1 to 2 cups of batter into the chocolate mix. Fold in gently to fully incorporate. No streaks please.

If you are using a bundt pan, you MUST spray it generously with a cake release spray. 
I do mean it when I advise that you use a cake release spray and use it generously.
As I mentioned in my introductory ramblings, the only way to get your cake released without it being stuck to the bundt pan is to use a cake release spray. Do not make the same mistake as I did. No amount of butter, butter and flour or oil will do the job. My first 4 cakes stubbornly stuck to the bundt pan because I did not want to buy a cake release spray.

Now that you have sprayed your bundt pan generously, start to dollop the butter and chocolate batter into the bundt pan. How?

Think of a checkerboard cookie.
Like these? Here's the link, Checkerboard Cookies.
The checkerboard cookie above has 4 layers. The 1.5 litre bundt cake pan would typically have 3 layers. 

Before you level the batter, you need to swirl the batter. Get a pair of chopsticks.

Space the chopsticks about 0.8"(2cm) apart in your hand. Stick the chopsticks into the batter without the chopsticks touching the bottom of the bundt pan. Move the chopsticks to make one complete circle. If you want more of a marble effect, go another round. I like my butter and chocolate to be distinctly apart so I can taste the separate flavours.

If you choose to use the sharp point/blade of a knife, the marbling will not be that distinct. You need a tool with a bit more width. The handle of a spoon/fork will do but use the wider surface to move the spoon forward in the batter.

Shake the pan to help level the batter. Level it further with the back of a spoon, leveling the entire surface.

Drop the pan once or twice from a height of 1" (2.5cm) to get rid of air pockets.

Bake in the preheated oven. Check the cake at 40 - 45 minutes and test with a skewer. If it comes out clean, remove from oven. The sides of the cake would also have slightly detached from the bundt pan.

If the cake is not ready, let it bake further and retest after 5 minutes.  It has never taken me more than 50 minutes to have the cake bake through.

Removing cake from bundt pan

Leave to cool on a wire rack for 20 minutes.

To remove the cake, drop the bundt pan on the floor from a 4" (10cm) height a few times. Should any batter be stuck to the pan, this helps to dislodge the cake from it. 

If you see, the cake rebounding in the bundt pan once the pan touches the floor, that's a good indication that all is good. Overturn the pan on the wire rack for the cake to cool completely before slicing.

You should have a very smooth looking marbled cake.
Tips

Get yourself a cake release spray if you are baking in a bundt pan. 

Alternatively, bake in a round ~ (9")(23cm) or square baking pan that has been lined with parchment paper and greased. Adjust cooking time accordingly.
WHAT'S COMING UP NEXT?                                             
What sets these cold marinated tomatoes from others? Ah, if you look closely you might just have the answer, if not, look out for my next post.


Tuesday, 27 October 2015

Osmanthus & Jasmine Flavoured Cookies


Hi! I'm now working from Wordpress. I've edited this post there, reformatted it so that it is much easier to read & follow my recipe. This link will take your directly to the recipe:
Link to my newest and old recipes, click:

These are very crisp cookies with wonderful floral undertones. 
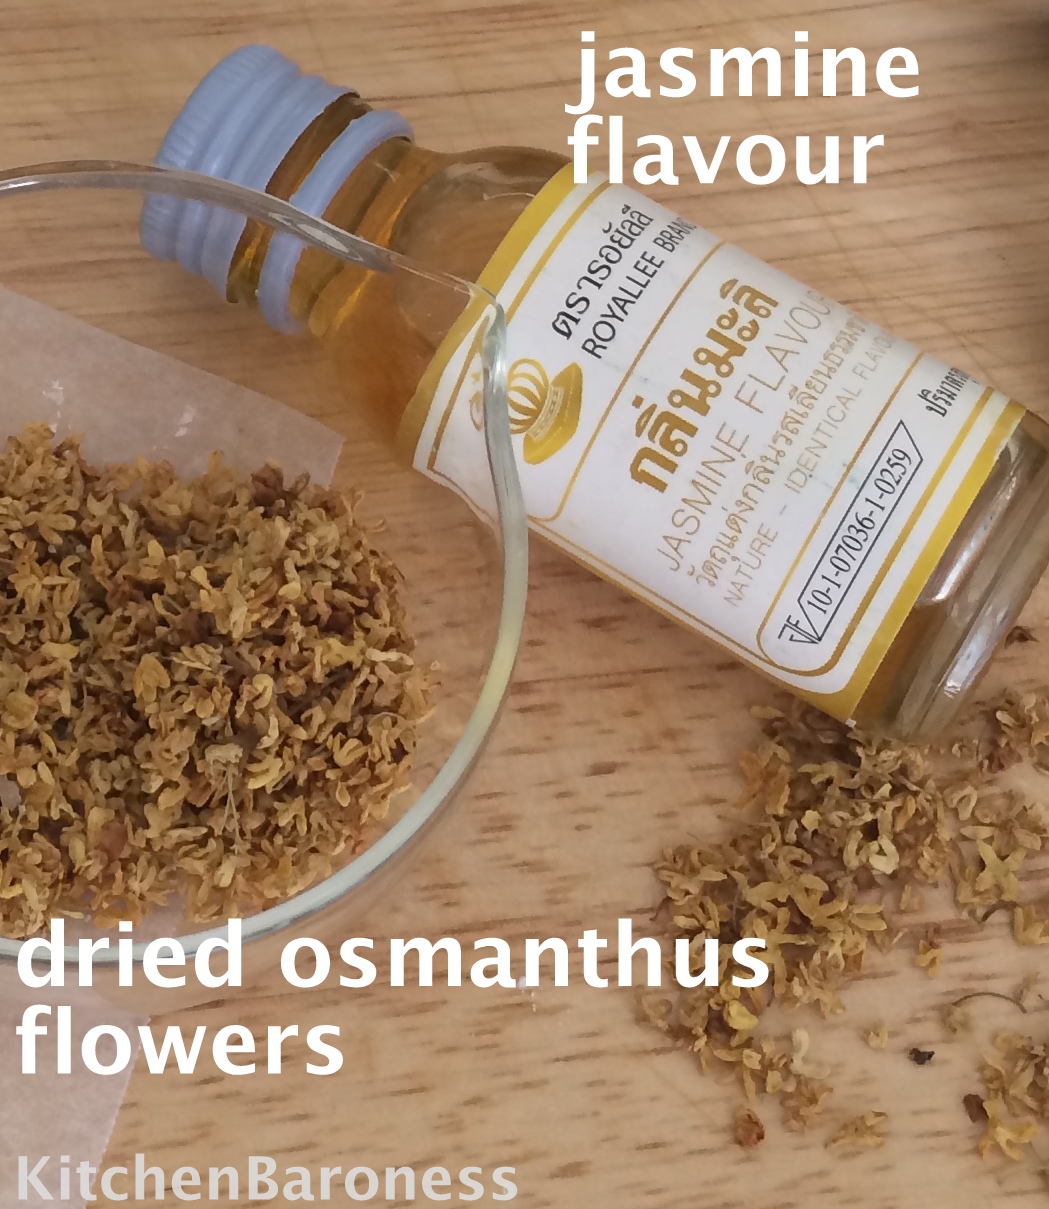
Osmanthus are highly perfumed flowers with a floral scent that is sweet and fruity at the same time. Unfortunately, no one has thought to bottle it into a food grade extract.

The dried flowers are commonly used in China to make a range of sweet dishes. The most enticing sounding one is osmanthus wine. I imagine it might taste sweet and floral. Perhaps like an aperitif or cream sherry?


I have only used the dried flowers to make myself tea but I so enjoyed the scent, I came up with this recipe. The flavours and aroma of the dried osmanthus flowers blooms best in a liquid. As this is a cookie dough, to help it along, a touch of jasmine extract is added to bring out the floral accents.
OSMANTHUS & JASMINE FLAVOURED COOKIES         
Prep:
10 minutes

Cook:

~15 minutes per baking tray

Inactive:

1 hour (for dough to firm up in refrigerator)

Level:

Easy

Makes:

50 cookies

Oven Temperature:

320F 160C

Can recipe be doubled?

Yes

Make ahead?

Keeps well for at least a week, tightly bottled. Dough can be rolled out, tightly wrapped and then frozen.
Just the ingredients
8 oz (225 g) unsalted butter
5.64 oz (160 g) confectioner's/icing sugar 
1 egg yolk
4 + 2 Tablespoons dried osmanthus flowers 
Jasmine flavour/extract
12.35 oz (350 g) all-purpose/plain flour 
2 Tablespoons rice flour
1/4 teaspoon salt
Ingredients

8 oz (225 g) unsalted butter
I use butter with a butterfat content of at least 82 to 83%. European butters typically have butterfat that falls within these percentages. I am partial to the French brand, President for baking these cookies. Whichever brand of butter you choose to use, it must have at least a minimum of 82% butterfat.The higher butterfat and lower water content content means a more buttery and crisp cookie. 

5.64 oz (160 g) confectioner's/icing sugar 

1 egg yolk

4 + 2 Tablespoons dried osmanthus flowers 
May be purchased from Traditional Chinese Medicine stores, some tea shops and health stores. It is available from online stores. I have never seen food grade osmanthus essence/extract/flavour sold anywhere. Scroll down to 'Tips' for other ways to use osmanthus flowers and a bit of information on this very floral smelling flower.

Jasmine flavour/extract
The amount of extract you use depends on its quality. I bought my bottle in Thailand. It is very mild. I had to use 1 and 1/2 teaspoons. You want a slight hint of jasmine as the floral scent of the osmanthus needs to come through as well. My bottle is hard to purchase outside Thailand but I noticed that you can buy rather good quality food grade jasmine extract on Amazon. 

12.35 oz (350 g) all-purpose/plain flour 

2 Tablespoons rice flour
This is that extra something that will make the cookies that bit more crisp.

1/4 teaspoon salt
Omit if you are using salted butter

Method

Remove the unsalted butter from the refrigerator and leave it out to soften. Soften means when you push on the butter with your finger, there is a firm give. The feel would be somewhat similar to when you use your finger to push into a firm pillow/cushion. You do not want the butter to be too soft or 'melty'.

If the butter has become too soft, firm it back up in the refrigerator. You do not want to use butter that has become too soft as it will not cream up thick and voluminous. Instead, it will be very liquid.

In a food processor, grind 4 Tablespoons of the osmanthus flowers with 3.52oz (100g) of the all-purpose/plain flour. You should have a fine powder. I use my coffee grinder.

Mix in the remaining all-purpose/plain flour, rice flour and salt. I use my food processor to do this and save myself the step of sifting.

Cream the softened butter with the sugar. Start at low to avoid the sugar from flying out of the mixer bowl and increase to medium-high speed for 2-3 minutes. 
Stop the mixture and scrape the bottom of the mixer bowl. Turn on the machine and let it run for 2-3 more minutes until it is pale and creamy.
Reduce to medium-low speed and add the egg yolk and the jasmine essence. Let the machine run for 1 minute. 

Turn off the machine. Scrape the bottom of the mixer bowl. Turn the machine back on and let it run for another minute. It will look even thicker and creamier.
Remove the mixer bowl.

With a spatula, fold in 1/3 of the flour mix. The flour does not have to be fully incorporated at this point.
Add the next 1/3 of the flour mix and repeat the procedure.
Finally, add the last 1/3 of the flour mix. Repeat procedure and do not over mix.
The following process is the easiest way to get the dough prepared for cutting. 

Plop the dough into a large food safe plastic bag. The bag should be big enough to accommodate the rolled out the dough. If it is not, split the dough into 2 bags instead. 
Placing a silicone baking mat under the plastic bag helps to secure it in place to make rolling a breeze. Fold the open end of the plastic bag under to form a rectangle.
Roll the dough out no thinner than 1/8" (0.317cm). 
No mess. No flour. Easier clean up. Refrigerate until completely cold and firm.

Preheat the oven to 320F(160C) oven rack adjust to lower middle position.

Have the following ready:
  • sharp/serrated knife
  • cookie cutter 
  • small bowl of flour (for dipping cookie cutter)
  • rolling pin
  • silicone baking mat or parchment paper lined baking tray(s)
Remove the rolled dough out from the refrigerator. If necessary, use the rolling pin to level out the dough.

With the knife, slice off the top sheet of the plastic bag to reveal the dough.

Dip the cookie cutter into flour, shake off excess and make a clean straight cut. You could slip your fingers under the plastic sheet to help pop up the cut cookie dough.  
With my 'food safe plastic bag' method, there is no need to flour your working surface or the rolling pin. No need to worry about cookie dough sticking to the working surface, over handling or adding too much flour- both of which could ruin the texture of your cookies. 

These cookies do not spread so you do not have to space them too far apart on your baking tray. 

Do not leave cut cookies on the kitchen counter. Either bake immediately or refrigerate as it has to be cold when it goes into the oven. This helps bake crisp cookies. The cookie will keep its shape better, retaining all the pretty ridges around its circumference.

Remember the remaining 2 Tablespoons of osmanthus? Press them on to your cut cookie dough.
Bake for 8 minutes. Rotate the baking tray front side back and bake for another 7 minutes or until the edges are very lightly browned. You want to keep the pale colour of the cookies. 
That is why the oven rack was positioned lower middle rack and the temperature was kept low.

Remove from the oven, leave to cool for 5-10 minutes on the tray as they are still fragile whilst hot. Thereafter, cool completely on a cooling rack. Store in airtight containers.

Tips

What do you do with the rest of the dried osmanthus flowers?
  • Store sealed in the refrigerator. It keeps well.
  • Make yourself some osmanthus tea. One teaspoon per cup.
  • Mix the osmanthus flowers with a tea of your choice to add a floral brew to your cup. 
  • If you google 'osmanthus jelly recipe', there are recipes (all similar) for that jelly.  It is an easy jelly recipe and it taste even more perfumed than my cookies. Some might find it overpowering whilst others just cannot get enough of it.
What are osmanthus flowers?

It comes from a flowering plant/shrub bearing tiny cream coloured flowers. 
What do you know? There is an osmanthus shrub in my neighbourhood!
It is more often than not used in its dried form as fresh osmanthus flowers are highly perishable. When dried, they are a lovely golden yellow. Most of the dried osmanthus sold in shops are from China. It is appreciated for its distinctive floral aroma. It is most often used in sweet dishes but it can apparently be used in savoury dishes as well. Osmanthus wine is enjoyed in China. It must taste lovely.

I buy my osmanthus from a Traditional Chinese Medicine store that carefully sources what they put on their shelves. They cost more but I pay the price for the assurance of quality.
WHAT'S COMING UP NEXT?                                         
I like a marbled cake that is not only moist. The buttered bits has to be buttery and the chocolatey bits has to taste intensely chocolatey. Just like the one below!


Tuesday, 20 October 2015

Rotisserie Chicken Stew With Grapes In Peppery Milk Sauce


Hi! I'm now working from Wordpress. I've spent a great deal of time editing and reorganising this post on Wordpress and it is so much friendlier to read & follow my recipe from there. Click on this link to take you directly to the recipe:
Link to my newest and old recipes, click:

A deli rotisserie chicken makes putting this meal on the table easy enough. I love the fresh crunch of the whole grapes. It offers a burst of juicy sweetness between bites of savoury meat and vegetables. 
This dish is as good as the chicken stock and rotisserie chicken. Use the best ones you can get your hands on and serve it at your next dinner or party to oohs and ahhs. 
ROTISSERIE CHICKEN STEW WITH GRAPES IN PEPPERY MILK SAUCE
Prep:
20 minutes

Cook:

20 minutes

Inactive:

-

Level:

Easy

Serves:

3 to 4 persons

Oven Temperature:

-

Can recipe be doubled?

Yes

Make ahead?

The vegetables could be cooked, cooled and refrigerated the day before. 20 minutes before you are ready to serve, bring it back to a gentle boil then add milk, roast chicken, etcetera.
Just the ingredients
3 Tablespoons oil
1 rotisserie chicken cut into 4 (discard backbone)
3/4 cup diced onions (~ medium size)
3/4 cup diced red bell peppers (~ small size)
3/4 cup diced celery (~ large stick)
1 lb (450g) potatoes peeled and cut into 2" X 2" (5X5cm)
3/4 cup carrot cut into 1.5"(3.81cm) (~ 1 medium size)
2 cups chicken stock
OR
2 cups water + 1.5 teaspoon chicken stock granules 
1 teaspoon dried oregano/rosemary/a bay leaf
1/2 - 1 teaspoon ground black pepper
1/4 - 1/2 teaspoon salt
3/4 cup (or more) milk
1 cup seedless grapes
1/4 -1/2 cup chopped parsley/coriander leaves
Optional: Cut chillies, crushed dried chillies, capers, cut lemons.
Ingredients

3 Tablespoons oil
1 rotisserie chicken cut into 4 (discard backbone)
Black pepper chicken is my favourite.
3/4 cup diced onions (~ medium size)
3/4 cup diced red bell peppers (~ small size)
3/4 cup diced celery (~ large stick)
1 lb (450g) potatoes peeled and cut into 2" X 2" (5X5cm)
3/4 cup carrot cut into 1.5"(3.81cm) (~ 1 medium size)
2 cups chicken stock
OR
2 cups water + 1.5 teaspoon chicken stock granules 
1 teaspoon dried oregano
You could also use rosemary, bay leaf, sage, etcetera.
1/2 - 1 teaspoon ground black pepper
1/4 - 1/2 teaspoon salt
3/4 cup (or more) milk
1 cup seedless grapes
1/4 -1/2 cup chopped parsley/coriander leaves
Optional: Cut chillies, crushed dried chillies, capers, cut lemons.

Method

In a deep pot, over high heat, fry the onions, red bell peppers and celery in oil until soft. 

Add the chicken stock/water+chicken stock granules, potatoes, carrot, dried oregano and ground black pepper. 

Cover and bring to a boil. Uncover. Continue to cook over medium-heat until potatoes and carrot are soft. The liquid should have reduced by ~1/4 - 1/2.

Add 3/4 cup milk and when it comes to a simmer, add the cut up chicken, nestling it at the bottom of the pot. Top up with more milk if necessary to bring the liquid halfway up the sides of the chicken. 

Bring it back to a simmer so that the chicken is heated through. Taste for saltiness and add salt now if required.

Stir in the grapes. Turn off the burner. Dress with the parsley/coriander leaves and any of the optional ingredients: cut chillies, crushed dried chillies, capers, cut lemons.

Serve.
Tips

This is very much a meal on its own as it has proteins, vegetables, carbohydrates and even a fruit! However, the sauce is really tasty and to stretch it further, you could choose to serve it with:
  • Buttered pasta (fettuccine is my favourite as the larger surface area allows maximum sauce absorption)
  • Butter rolls
  • Buttered rice
WHAT'S COMING UP NEXT?                                           
What's this? Osmanthus biscuits.